This is the story of how we fitted out the 67 Designs' Sprinter for Overland Expo in about 15 minutes and created a very solid 'command center'.
This project started after loading the Sprinter for Overland Expo Mountain West 2021 and realizing we were still fumbling with our phones in the low down cup holders. It was the classic example of the Cobbler's Children proverb.
Below is what we did with 2 x 100mm sections of Series 55™ Rails and mounting packs together with various arms and holders.

Step 1 - Figuring out a place for the Series 55 Rail.
The VS30 Sprinter has lots of places to install the Series 55 Rail sections. We considered the best area was in the gray section of the dash below the flat radio fascia, but we had zero time to explore the dash and make a full analysis.
In the end we chose the location on the radio fascia for the following reasons:
- The Sprinter we purchased has the lowest level 'cargo van' radio head unit and so it was easy to work around. A larger 'premium' screen would not have given as much plastic real-estate and so we decided to use what we had.
- We liked the fact the phones would be below the line of the dash, but still allow the driver to see the road.
- The air vent was left clear and we could see the radio and heater/AC controls.
- It would be the easiest Sprinter dash component to replace if we just got it all wrong. After all, we were just guessing on the best location in the 15-20 minutes we had to install our cross-country device holding setup.
Step 2 - Blue Tape the general area for the 100m rail sections.
There is nothing scientific about this. We guessed on likely edge of radio frames and put on the tape. The tape helps the small initial drill from wandering.

Step 3 - Positioning the 100mm sections to mark the holes.
This seems obvious, but it was just a rapid case of eyeballing what we thought would be the best clear location and with a Sharpie marked the two holes. We offer a template on the site, but we had no time to print that out. We encourage those with time to do the job slowly to consider using the template instead.

Step 4 - Drilling small diameter pilot holes.
We do this to prevent drill drifting and inaccurate holes. It is just easier to use a small drill at this stage. Also, it's a 'low cost' way to discover if your 'best guess' on radio our other behind the dash frames were correct.

Step 5 - Fully committing in the 7.5mm drill.
This is when the reason for Step 4 makes sense. Use the pilot hole well and GO SLOW. Almost all car dash plastic is thin and a large drill will pierce and pull you in. Just take it slow and have a good drill to slowly cut a nice clean 7.5mm hole for the rivnut (included in the mounting kit).

Step 6 - Remove the Blue Tape
Make sure the holes are clean and look good. Remember the rivnut needs to push into a tight 7.5mm hole before compression.

Step 7 - Install the Rivnuts (included in the mounting kit)
This step goes very quickly and with a simple rivnut installer tool (see this article for details) and a clean and tight 7.5mm hole this should take little time.
Our one major piece of advice here is to ensure the head of the rivnut is fully in contact with the face of the dash or surface before using the tool to compress the rivnut. Take a second or two to check before squeezing the trigger on the tool.

Step 8 - Slip the Series 55 mounting plates on the Series 55 Rail
The small black nylon plates need to be slipped onto the rail ends. We did not use the supplied middle support given our vertical installation.

Step 9 - Install the 5mm fasteners and tighten.
Again, another very obvious step, but take your time. We suggest always to install the top and bottom first for a thread or two. Avoid installing one tight and hunting for the other. This is the moment of truth on how accurate your marking and drilling was. We got lucky at the speed we were going that our rivnut threads lined up perfectly. However, take your time.
Our only word of caution for anyone that has not used rivnut before is this; take your time and do not grind in a steel fastener with torque against a soft aluminum rivnut. This will help prevent needlessly cross-threading a rivnut.

Step 10 - Install the "BT55" 20mm trackballs
We decided our command center for the driver and co-driver was going to need just 4 trackballs for 2 x phones, 1 x iPad Mini and 1 x GoPro. There is space for two more, but 4 would sufficient.
Slide in the Series 55 "BT55" trackballs and tighten. There is nothing simpler.


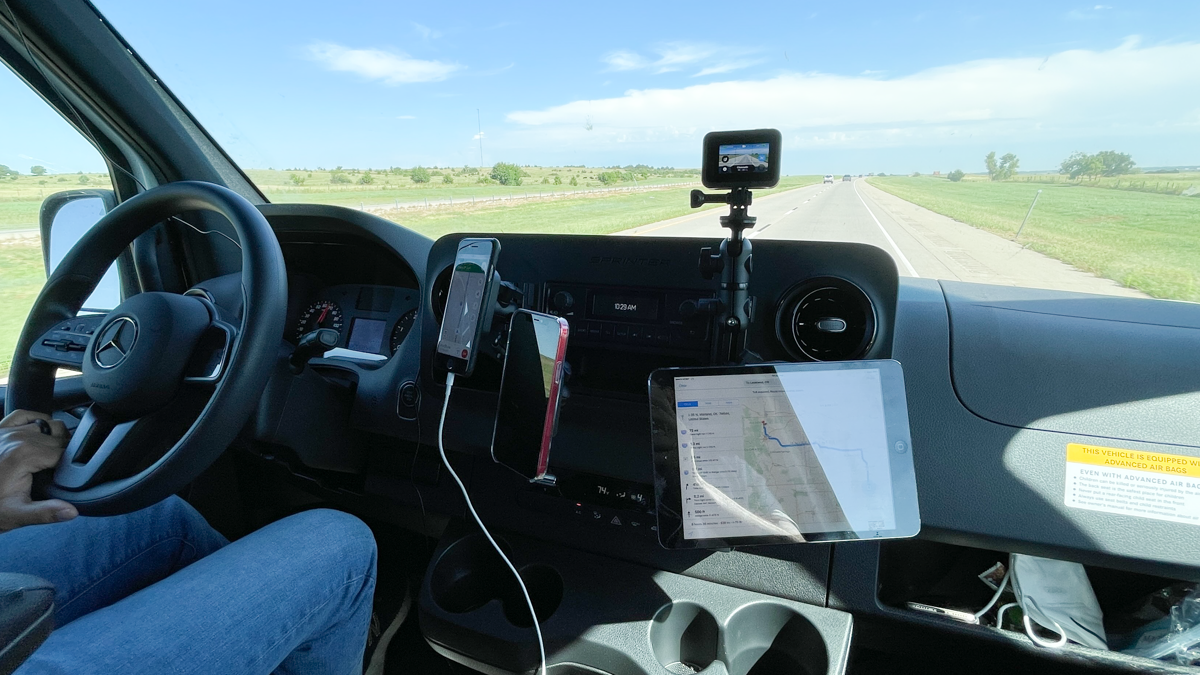
Step 11 - Install the arms, holders and devices.
Stating the obvious, but here is the result of our last minute Series 55 installation before setting out for Loveland, Colorado.


Conclusion:
The Series 55 Rail system is a really simple and clean way to begin mounting your devices. It can take just minutes to create a command center for the open road and yet keep it discrete and simple.
We have also been seeing customer images of Series 55 installations on boats, RVs and commercial vehicles of all kinds.
We certainly do not encourage anyone to undertake speed installs as we had to do before leaving for Overland Expo Mountain West. In fact, the opposite. Take your time and explore your dash before any drilling. Be creative with the Series 55™ options. If needed, consult with your dealer or automotive aftermarket specialist for what may be behind the plastic in your vehicle. Remember, if you can get access to the dash plastic, do that and use the washers and nuts, to setup your devices to stay safe and legal on the road.
Related articles:
If you have any questions or feedback about this article, drop our customer service team a note by emailing customerservice@67d.com.